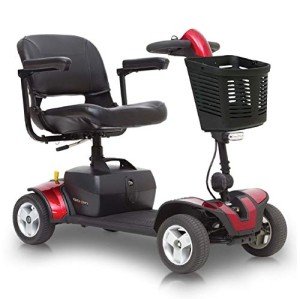
Understanding the Disassembly of the ST1 Travel Mobility Scooter: A Comprehensive Guide
In an age where mobility scooters are becoming commonplace for individuals seeking freedom and independence, understanding their operation and maintenance is crucial. The ST1 Travel Mobility Scooter is celebrated for its compact design and ease of use, particularly for those who wish to maintain a semblance of active living. This guide offers a thorough guide on how to disassemble the ST1 scooter into five parts, ensuring proper maintenance, repair, and storage.
Why Disassemble the ST1 Travel Mobility Scooter?
Disassembling the ST1 scooter can serve various purposes:
- Transportation: It allows for easier transport in vehicles.
- Maintenance: Regular checks and maintenance are simplified.
- Storage: Compact storage is a practical advantage.
- Repairs: Enables access for repairs or part replacement.
- Customization: Users can personalize their scooter by switching out parts.
Overview of the Disassembly Process
Before proceeding, ensure you have a clean, spacious area to work in and the necessary tools, such as a Phillips screwdriver and a wrench. The five main sections of the ST1 Travel Mobility Scooter include:
- Seat Assembly
- Battery Pack
- Base Frame
- Front Assembly (including handlebars)
- Rear Wheel Assembly
Step-by-Step Disassembly of the ST1 Travel Mobility Scooter
Here’s a detailed breakdown of how to disassemble each section.
Step 1: Seat Assembly
The first step in the disassembly process is to remove the seat.
- Locate the Seat Release Lever: The seat is often secured to the base with a release lever.
- Lift the Seat: Press the lever while lifting the seat upwards. It should detach smoothly.
- Store the Seat: Place the seat in a safe location to prevent damage.
Step 2: Battery Pack
Next, you’ll want to safely remove the battery pack.
- Disconnect the Power: Ensure the scooter is turned off before proceeding.
- Locate Battery Compartment: This is generally found on the base frame.
- Remove Connectors: Carefully disconnect the battery leads, ensuring not to damage them.
- Lift Out the Battery Pack: Remove the battery pack by lifting it from its housing.
Here's a quick table summarizing the battery pack removal steps:
| Step | Description | Note |
|---|---|---|
| Disconnect Power | Turn off the scooter | Safety first! |
| Locate Compartment | Find the battery compartment | Usually accessible from the rear |
| Remove Connectors | Carefully disconnect battery leads | Ensure correct handling |
| Lift Battery Pack | Remove from housing | Use caution, as batteries can be heavy |
Step 3: Base Frame
The next part you need to detach is the base frame.
- Secure the Scooter: Place the scooter on a level surface.
- Unscrew Base Panel: Use a Phillips screwdriver to remove screws from the base.
- Pull Apart Sections: Gently pull apart the sections until they fully separate.
Step 4: Front Assembly (Including Handlebars)
The front assembly is next on the list.
- Locate the Fasteners: Identify screws or locking mechanisms on the handlebars.
- Unscrew: Remove all fasteners using a screwdriver.
- Detach Handlebars: Gently lift the handlebars away from the front assembly.
Step 5: Rear Wheel Assembly
Finally, disassemble the rear wheel assembly for complete disassembly.
- Stabilize the Scooter: Ensure that the scooter remains stable while working.
- Unscrew Wheel Attachments: Use a wrench to remove the bolts securing the rear wheels.
- Lift Off the Wheels: With bolts removed, carefully lift the rear wheels away from the axle.
Tips for Reassembly
Once your maintenance or transportation needs are complete, reassembly is straightforward. Here are some essential tips:
- Organize Parts: Keep each disassembled section grouped together.
- Follow Reverse Steps: Reassemble by following these steps in reverse order.
- Test Functionalities: Before using, check each part for firmness and connection.
FAQs About the ST1 Travel Mobility Scooter Disassembly
Q1: What tools do I need for disassembling the ST1 scooter?A1: Primarily, you will need a Phillips screwdriver, a wrench, and possibly some safety gloves.
Q2: Is it safe to disassemble my mobility scooter?A2: Yes, as long as you follow the correct procedures and handle parts carefully to avoid damage.
Q3: How often should I disassemble my scooter for maintenance?A3: It is advisable to check and maintain your scooter every few months, or as needed.
Q4: Can I perform repairs myself?A4: Minor repairs can generally be performed by users, but more significant issues might require professional assistance.
Q5: Will I void my warranty by disassembling the scooter?A5: It depends on the manufacturer’s warranty policy. Check your warranty terms before proceeding.
The ST1 Travel Mobility Scooter is an invaluable device providing freedom to many individuals. Understanding how to disassemble the scooter into its five main components can empower users to maintain their mobility aids more effectively and responsibly. Regular checks can enhance their longevity and performance, ensuring they can keep moving for years to come.


